Five Tips For Photographing Snow

Daily Photo – Snow at Pukehiki Library

Five Things to Think About When Photographing Snow

A few emails have arrived asking for some tips on photographing snow, particularly from people who aren’t necessarily out there with a camera every day, but who suddenly find themselves surrounded by a winter wonderland with the family in tow and want to come home with a few good photographs.

So, while this isn’t quite my usual sort of post, I thought I’d put together a few things that might help.

Why is my beautiful white snow grey?

This is probably the most common problem. You look out at a landscape covered in beautiful, clean, white snow, take a photograph and discover that your camera has decided the snow should be a rather miserable shade of grey.

The reason is that your camera is trying to be clever. It sees all that bright snow and thinks there’s far too much light, so it darkens the whole photograph. If you’re using a phone, try tapping on the snow and then sliding the exposure control slightly brighter. If you’re using a camera with manual controls, try increasing your exposure compensation a little.

The important thing is to check the photograph afterwards. If the snow looks grey, brighten it up. If it starts looking like a glowing white sheet with no detail at all, you’ve probably gone too far.

Why does everyone look so dark?

This is another common one, especially when you’re photographing the family standing in front of a large snowy landscape. The camera sees all that bright white snow, exposes for it and leaves the people looking rather like silhouettes.

If you can, position your family so they’re facing towards the light (but be carefully to not have them facing directly into it as everyone will be squinting) rather than having the brightest part of the sky behind them. Your phone’s setting can also help balance the bright snow with the darker faces.

And don’t be afraid of using the flash. Yes, I know, you’re standing outside in broad daylight and it seems completely unnecessary, but a little flash can add some light to people’s faces and make a surprisingly big difference. Photographers will often use flasgh outside in daylight, even if it’s just a little for the eyes!

Why does my snow photograph look so boring?

This is perhaps the biggest challenge of all. Snow can look absolutely magical when you’re standing in it, but photographs have an annoying habit of reducing all that magic to a large white expanse.

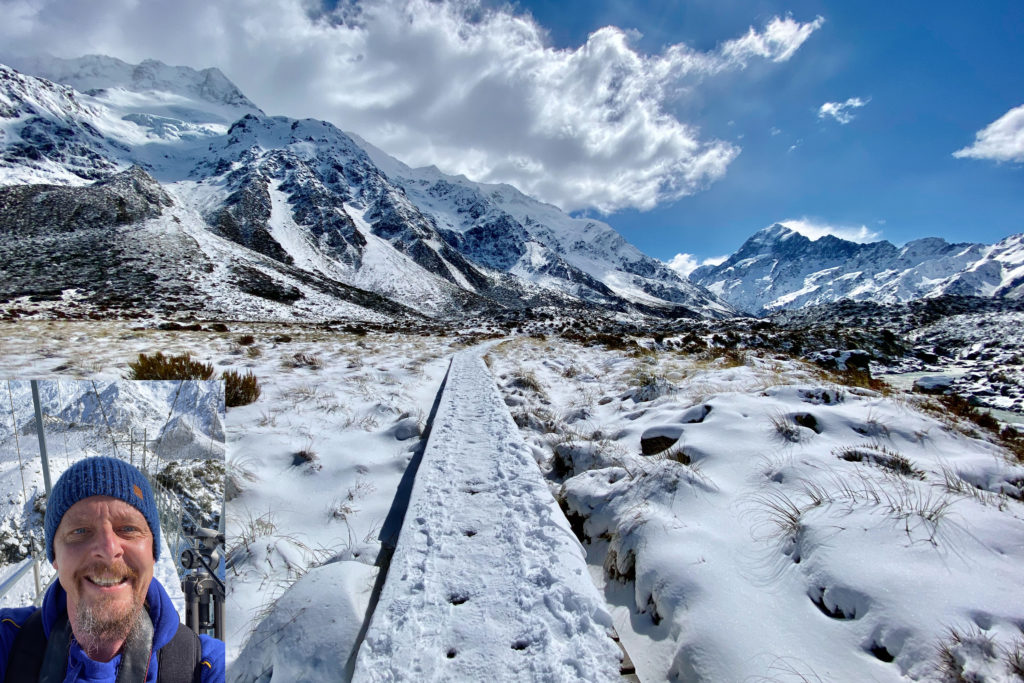
The answer is to look for something that breaks up all that whiteness. A person standing in the landscape, a row of trees, a fence disappearing into the distance, a brightly coloured jacket or even a set of footprints can give the photograph some shape and, importantly, a sense of scale.

If you’re photographing the family, don’t necessarily line everyone up and tell them to smile. Photograph them making a snowman, throwing snowballs or trudging through the snow. The snow is the setting. What your family is doing in it is the story.

Where did all the snowflakes go?

If it’s actually snowing, you might expect your photograph to be filled with beautiful, delicate snowflakes. Instead, you look at the result and wonder where they’ve all gone.

Snowflakes can be surprisingly difficult to photograph, especially with a phone. They can be almost invisible against a bright background.

Try finding a darker background, such as trees or a building, which will make the falling snow much easier to see. If you’re photographing children running around, jumping or throwing snowballs, use your phone’s burst or action mode if it has one. With a camera, a faster shutter speed will help freeze all that activity.

Of course, you could also embrace the blur. Sometimes a slightly blurred photograph of a child charging through the snow tells you far more about the day than a technically perfect photograph ever could.

Don’t forget that your camera is getting cold and wet

This is the one that can turn a lovely day in the snow into a very expensive trip to the camera shop.

Snow and cameras aren’t necessarily natural friends. Keep an eye on moisture getting onto your lens and, if you’re using a camera, remember that batteries don’t particularly enjoy the cold. Keeping a spare battery in an inside pocket can be a very good idea.

The other thing to remember is condensation. If you’ve been outside in the cold and then bring your camera straight into a warm house, moisture can form inside and around it. If possible, put the camera into a sealed bag before going inside and allow it to warm up gradually.

Bonus Tip: Take Lots of Photographs

Allow yourself to play! Try different settings, different angles, different focal lengths and different ways of using the light. Don’t just take one or two photographs and then move on. Take twenty. Take fifty. Take a hundred if you want to. Once you’re finished, you can always go back through them and delete the ones you don’t want.

If you take two photographs, you’ve got a fairly slim chance of getting exactly the photograph you’re hoping for. Take twenty, however, and your odds of finding a good one are suddenly much better. And if you’re running out of space on your digital memory, have a quick look through the images and delete a few of the obvious rejects.

As an example, I took nearly forty photographs of this particular tree in the Strath Taieri, moving around to all sorts of different positions, trying different focal lengths and making adjustments to the exposure and the way I was working with the light. I wanted to make sure I had the photograph I was looking for. By the time I’d finished, I was fairly cold, but fortunately the car’s heating was more than sufficient to warm me up again.

And that’s really the beauty of digital photography. You can experiment, make mistakes and try again. The only thing it costs you is a little time, and perhaps a few gigabytes of storage.

And finally, probably my best piece of advice is this: don’t spend the entire day worrying about getting the perfect photograph.

Enjoy the snow.
Why This “Quiet” Photo Was a Technical Battle

A bit of a change in direction today and a break from the usual travelogue …

Daily Photo – Lan Yuan

Why This “Quiet” Photo Was a Technical Battle

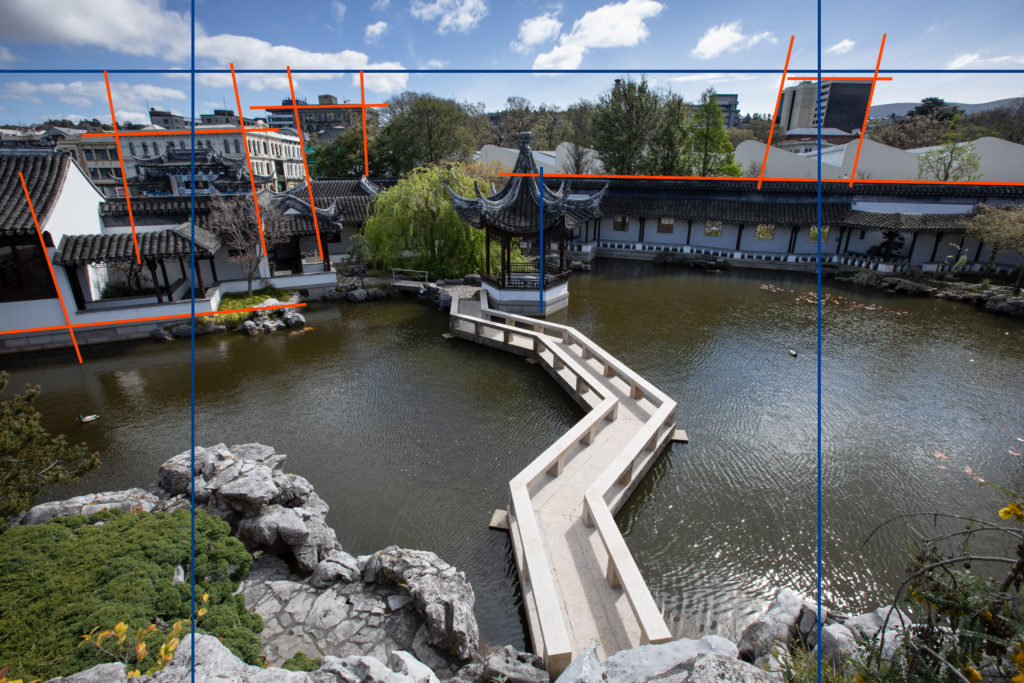
Every now and then, you take a photo that looks like it should be the easiest thing in the world. It’s a beautiful scene, some tranquil garden, maybe, or a quiet street. You look at the raw file (that top image, the one with all the orange marks) and think, lovely. You look at the final image (the bottom one), and you think, perfect.

But what’s the distance between lovely and perfect? That’s where the work sits. And in a photo like this, that work is all down to one of the most stubborn issues a photographer faces when shooting architecture: converging verticals.

The Problem with the Real World

The buildings in this shot that surround the Dunedin Chinese Gardens are meant to stand upright, proud, and square. But because of the lens, the height and the angle the camera lens did what it does best: it lied.

If you look closely at the raw file, you can see how those vertical lines, the edges of the walls, the pillars, the windows are all leaning into the centre. They look like they’re about to fall over, or maybe they just had a long night. It’s that classic “keystone” effect, and it immediately breaks the serene feeling of the place.

Now, this isn’t just one building. This is a complex arrangement of walls and corners, all at slightly different distances and angles. It’s a technical nightmare in the editing suite because correcting one set of lines perfectly often makes the adjacent set of lines look completely warped. It’s like trying to untangle one knot on a fishing line only to find you’ve created three more.

The Grunt Work in the Post-Processing Darkroom

There’s no magic button for this. Getting from that leaning, slightly chaotic raw file to the balanced, final image was a process of very fine adjustments, the kind that requires a cup of coffee and a lot of quiet concentration.

I had to put on my architect’s hat and methodically tackle the geometry:

Transform Tool, Not Magic: This involved manually adjusting the perspective and vertical guides both Lightroom and Photoshop. I wasn’t just pulling a slider; I was nudging it, checking the highlighted lines (the ones I’ve marked in orange), nudging again, checking the opposite side, and then nudging again until the eye accepted the view as naturally straight.

Fighting the Stretch: When you correct converging lines, you stretch the image. You have to be mindful that the proportions of the elements, the windows, the roof overhangs don’t become too tall or too thin. It’s a constant trade-off between straight lines and believable shapes.

The Final Layers: Only once the structure was sound and once the buildings looked like they were firmly anchored and not listing like a rusty ship could I move on to the easier, more enjoyable work of bringing the whole scene to life.

In the end, what looks like a simple, polished photograph is really a technical triumph over the lens’s distortions. It’s proof that sometimes, the most peaceful scenes are the ones that demand the most time and technical fussing to get right.

It’s that quiet satisfaction, the one you get from fixing a complex problem without leaving a trace of the effort, that makes the whole process worthwhile. It’s also a reminder to work slowly, and look carefully. 

I’d love to hear your thoughts. Has anyone else had a deceptively difficult image like this? Share your perspective battles below.

Life on Mars?

Alec Soth is a well-known American photographer from Minneapolis, who is recognised for his large-format, documentary-style work that captures life in the American Midwest. In a series called Room 303: Alec Soth’s Visions of Venice, he shot a series of images from Hotel Danieli in Venice, inspired by early color images by fellow photographers Dennis Stock and Erich Hartmann. It’s well worth a look.
Room 303: Alec Soth’s Visions of Venice


Daily Photo – Life on Mars?

Lightroom presets have been around for a long time now. In fact, since 19th February, 2007 (I looked it up!) with the re-release of Adobe Photoshop Lightroom 1. The re-release of Lightroom gave users the ability to save and apply presets when editing photos. The saved settings could then be applied to other images. Now, 18 years later they are still as much fun to play around with as they ever were. I’ve got loads of presets saved in my version of Lightroom, all with weird and wonderful names. This photo was edited with a preset called ‘Life on Mars?’

More Textures

Did you know you can search for content using the category link?

Click on the category search buttons to find further content related to that category.

Daily Photo – Corner of London and George Street

Here’s another photo with textures that I finished recently. In fact, it’s technically a re-edit of a photo I posted last year of local pub The Bog (formerly The Royal Albert Hotel and The Albert Arms) which I rather liked when finished with some texture. 

Re-editing photos by adding a bit of enhancement via textures is a great way to breathe new life into a photo, it can lift a flat photo or  just a fun way to play around with images – as in this case. I believe it has around five or six layers of textures finished with a bit of vignetting before saving.

Textures

Did you know you can search for content using the category link?

Click on the category search buttons to find further content related to that category.

Daily Photo – Lake Hayes with Texture

Departing from my usual writing narrative that accompanies my images, I wanted to allow myself to change direction every now and then with posts for something different. So, with that in mind, I thought I’d put up a post about using textures in photos. 

If you don’t mind a bit of enhancement in your images, textures are a really fun concept to play around with. When you add textures to photos, you do so via layers. The more textures you want to add to a photo, the more layers you require. I’ve done images with simple two or three layers of textures and more complex images that have over thirty to forty layers on them. Once you know how to add textures to an image, the real trick is knowing when to stop as it’s easy to kill an image with too many textures.

This image of Lake Hayes has around twelve to fifteen layers including some split tones from memory.

Textures of the Haast River

The Haast River with Textures

This is one of my latest images, again it’s another one with textures. This time of the Haast River in the South Island here in New Zealand. Due to the weather (which was terrible) the sky was a mix white nothingness while the river and surrounding banks were wet, dark and gloomy. So, I went with stone textures in the sky and carried them around the edges where I also added a little vignetting to add mood. All up it took about an hour, which is a lovely relaxing way to pass the time.

Dunedin Sunset With Texture

Dunedin sunset with textures – Buy 

There have been some wonderful sunrises in Dunedin lately and even better sunsets. At the moment, here in Dunedin, as we move through autumn and slowly approach winter, the sun has been setting at 5:30pm. Meaning, the long summer evenings are definitely gone and the chilly winter nights aren’t far away. However, recently the evenings here have been still and warm, resulting in some lovely sunsets.

Wanaka In Textures

Wānaka In Textures

When I came up with the idea of visiting Wānaka for a few days between Christmas and New Years, I prepared myself for many things. I was prepared for a lack of parking, a crowded lake front, youths gathering in public places with large amounts of alcohol, expensive jet skis populating the lake, crowded restaurants and take away outlets and loud base thumping music late into the night. In fact, I would have been a little disappointed if all these things weren’t present.

What I discovered was the best way to tackle Wānaka was to do any shopping that was required while the youth population were still in bed (pre midday), have a large lunch and then enjoy the afternoon and evening sunshine. This proved to be a successful tactic, until I decided to eat at Subway at 6:00pm!


Want to get a print for your wall? Download the print price guide below, then email [email protected] with your details and we’ll get an order underway for you.

Print Price Guide 2021 – Download